A Jira administrator makes the following changes to User Default Settings:
• Default sharing for filters and dashboards is set to Public.
• Autowatch own issues is set to Yes.
Which two statements are definitely true? (Choose two.)
Only newly created dashboards will reflect the new default setting.
Saved filters using the old default setting will reflect the new default setting.
Only newly created saved filters will reflect the new default setting.
All users will become watchers of issues they have created in the past.
The changes toUser Default Settingsaffect the default behavior for new filters, dashboards, and issue watching. The two statements that are definitely true areonly newly created dashboards will reflect the new default setting(Option A) andonly newly created saved filters will reflect the new default setting(Option C), as these settings apply to new creations only.
Explanation of the Correct Answers:
Only newly created dashboards will reflect the new default setting (Option A):
Changing theDefault sharing for filters and dashboardstoPublicin User Default Settings sets the default sharing option for newly created dashboards toPublic. Existing dashboards retain their original sharing settings (e.g., Private, Group) and are not affected by the change. Only dashboards created after the setting is updated will default toPublic.
Exact Extract from Documentation:
Manage user default settings
TheDefault sharing for filters and dashboardssetting determines the default sharing option for new filters and dashboards.
To configure:
Go toSettings > System > User default settings.
SetDefault sharingtoPublic,Private, or another option.Impact:
Only newly created filters and dashboards use the new default setting.
Existing filters and dashboards retain their original sharing settings.Note: Requires Jira administrator permissions.(Source: Atlassian Support Documentation, "Manage user default settings in Jira Cloud")
Why This Fits: The change toPublicsharing applies only to newly created dashboards, making Option A definitely true.
Only newly created saved filters will reflect the new default setting (Option C):
Similarly, theDefault sharingsetting affects the default sharing option for newly created saved filters. Filters created after the change will default toPublic, but existing filters keep their original sharing settings (e.g., Private, Group).
Exact Extract from Documentation:
Manage user default settings
Changing theDefault sharing for filters and dashboardstoPublicapplies to new filters and dashboards only.
Impact:
Existing saved filters are not updated to the new default sharing setting.
New filters created after the change will default toPublic.(Source: Atlassian Support Documentation, "Manage user default settings in Jira Cloud")
Why This Fits: The change toPublicsharing applies only to newly created saved filters, making Option C definitely true.
Why Other Options Are Incorrect:
Saved filters using the old default setting will reflect the new default setting (Option B):
Existing saved filters do not automatically update to the new default sharing setting (Public). They retain their original sharing configuration (e.g., Private, Group) set at creation, so this statement is false.
Extract from Documentation:
Existing filters and dashboards are unaffected by changes to theDefault sharingsetting. Only new creations use the updated default.
(Source: Atlassian Support Documentation, "Manage user default settings in Jira Cloud")
All users will become watchers of issues they have created in the past (Option D):
SettingAutowatch own issuestoYesenables autowatching for issues createdafterthe setting is changed. It does not retroactively add users as watchers to issues they created in the past. For past issues, users must be manually added as watchers or an automation rule must be created, so this statement is not definitely true.
Extract from Documentation:
TheAutowatch own issuessetting applies to issues created after the setting is enabled. It does not affect previously created issues.
(Source: Atlassian Support Documentation, "Manage user default settings in Jira Cloud")
Additional Notes:
ConfiguringUser Default SettingsrequiresJira administratorprivileges and is done inSettings > System > User default settings.
Users can override the default sharing setting when creating filters or dashboards (e.g., choosing Private instead of Public).
To retroactively apply autowatching to past issues, a bulk operation or automation rule would be needed, but this is not automatic.
Your team currently only uses a single issue type but wants to add a second one. Which configuration requires a separate project for the second issue type?
Different custom fields per issue type
Different card colors per issue type
Different components per issue type
Different issue layouts per issue type
Different workflows per issue type
In a company-managed project, adding a second issue type can often be accommodated within the same project by configuring issue type-specific settings (e.g., fields, layouts). However, if the second issue type requires adifferent workflow, a separate project may be necessary unless the project’sworkflow schemeis modified to support multiple workflows. Since the question implies a configuration thatrequiresa separate project,different workflows per issue type(Option E) is the most likely to necessitate this, as it involves complex workflow management that is often easier to handle in separate projects.
Explanation of the Correct Answer (Option E):
In a company-managed project, aworkflow schememaps workflows to issue types. It is possible to assign different workflows to different issue types within the same project by configuring the workflow scheme. However, managing multiple workflows within a single project can become complex, especially if the workflows have significantly different statuses, transitions, or rules. Creating a separate project for the second issue type simplifies workflow management by isolating the workflows, as each project can have its own workflow scheme. The question’s phrasing suggests a scenario where a separate project is required, likely due to the complexity or isolation needed for distinct workflows.
Exact Extract from Documentation:
Configure workflow schemes
A workflow scheme maps workflows to issue types in a company-managed project.
To use different workflows:
Go toSettings > Issues > Workflow schemes.
Create or edit a scheme and assign different workflows to issue types (e.g., one for Issue Type A, another for Issue Type B).
Apply the scheme to the project inProject settings > Workflows.Note: For complex or conflicting workflows, separate projects may be preferred to simplify management and avoid configuration conflicts.(Source: Atlassian Support Documentation, "Configure workflow schemes")
Why This Fits: While different workflows can technically be managed within one project via a workflow scheme, the complexity or need for isolation (e.g., different teams, permissions, or configurations) often necessitates a separate project for the second issue type’s workflow, making Option E the correct answer.
Why Other Options Are Incorrect:
Different custom fields per issue type (Option A):
Different custom fields can be configured for eachCustom field contextsorscreen schemesallow different fields to be shown or hidden for specific issue types within the same project. A separate project is not required.
Extract from Documentation:
Custom field contexts or screen schemes can restrict fields to specific issue types within a single project. Separate projects are not needed.
(Source: Atlassian Support Documentation, "Manage custom fields in Jira Cloud")
Different card colors per issue type (Option B):
Card colors on boards (e.g., Kanban, Scrum) are configured per issue type usingboard settings(e.g., based on issue type or priority). This is managed within a single project and does not require a separate project.
Extract from Documentation:
Card colors are configured inBoard settings > Card colorsand can vary by issue type within the same project.
(Source: Atlassian Support Documentation, "Configure boards in Jira Cloud")
Different components per issue type (Option C):
Componentsare project-specific, not issue type-specific. While components can be assigned to issues, they are not tied to issue types, and different components can be used within the same project without needing a separate project.
Extract from Documentation:
Components are project-specific and can be assigned to any issue type within the same project.
(Source: Atlassian Support Documentation, "Manage components in Jira Cloud")
Different issue layouts per issue type (Option D):
Issue layoutscan be configured per issue type within a single project inProject settings > Issue layout. Different layouts for each issue type do not require a separate project.
Extract from Documentation:
Issue layouts can be customized for each issue type inProject settings > Issue layoutwithin the same project.
(Source: Atlassian Support Documentation, "Configure issue layouts in Jira Cloud")
Additional Notes:
Steps to configure different workflows:
Create a new workflow for the second issue type inSettings > Issues > Workflows.
Update the project’s workflow scheme inProject settings > Workflowsto map the new workflow to the second issue type.
Alternatively, create a new project with its own workflow scheme for simplicity.
Configuring workflows and schemes requiresJira administratorprivileges.
A separate project may be preferred for organizational reasons (e.g., different teams, permissions), but technically, a single project can handle different workflows. The question’s emphasis onrequiringa separate project points to workflows due to their complexity.
Users complain that they can see a particular custom field in all company-managed projects except one. Identify two possible reasons. (Choose two.)
Groups
Project roles
Security levels
Screen
Issue layout
Validator
Step property
The issue is that a custom field is visible in all company-managed projects except one, indicating a project-specific configuration is preventing the field from being displayed. The two possible reasons areScreen(Option D) andIssue layout(Option E), as these configurations control whether a field appears in a project’s issue operations or view.
Explanation of the Correct Answers:
Screen (Option D):
In company-managed projects,screensdetermine which fields are displayed during issue operations (Create, Edit, View) for specific issue types, as defined by thescreen scheme. If the custom field is not included on the screen(s) used by the problematic project’s issue types, users will not see the field when creating, editing, or viewing issues in that project. This could explain why the field is missing in one project but visible in others.
Exact Extract from Documentation:
Configure screens in company-managed projects
Screens define which fields are available during issue operations (Create, Edit, View). Each project uses a screen scheme to map screens to issue types and operations.
If a field is not on a project’s screen:
Users cannot see or interact with the field in that project.To check:
Go toProject settings > Screens.
Verify if the custom field is included on the relevant screens.Note: A field must be on the screen to be visible during issue operations.(Source: Atlassian Support Documentation, "Configure screens in Jira Cloud")
Why This Fits: If the custom field is not on the screen(s) used by the project, it will not be visible, makingScreena possible reason for the issue.
Issue layout (Option E):
Theissue layoutin a company-managed project controls which fields are displayed, hidden, or placed in the context panel in the issue view. If the custom field is moved to theHidden fieldssection in the issue layout for the problematic project, users will not see it when viewing issues, even if the field is on the screen and contains data. This could explain the field’s absence in one project.
Exact Extract from Documentation:
Configure issue layouts in company-managed projects
Issue layouts determine which fields are displayed or hidden in the issue view.
To hide a field:
Go toProject settings > Issue layout.
Move the field to theHidden fieldssection.Impact: Hidden fields are not shown in the issue view, even if they areon the screen and have values.Note: Issue layouts are project-specific and can differ between projects.(Source: Atlassian Support Documentation, "Configure issue layouts in Jira Cloud")
Why This Fits: If the custom field is hidden in the issue layout for the problematic project, it will not be visible in the issue view, makingIssue layouta possible reason.
Why Other Options Are Incorrect:
Groups (Option A):
Groups are used in permission schemes or field configurations to control access or behavior, but they do not directly determine field visibility. If the field is visible in other projects, the issue is not group-related, as groups apply globally or via schemes shared across projects.
Extract from Documentation:
Groups are used for permissions or field restrictions, not for controlling field visibility on screens or layouts.
(Source: Atlassian Support Documentation, "Manage groups in Jira Cloud")
Project roles (Option B):
Project roles are used in permission schemes to grant permissions (e.g.,Edit Issues). They do not control whether a field is displayed on a screen or in the issue layout. The issue is about visibility, not permissions.
Extract from Documentation:
Project roles manage permissions, not field visibility. Check screens or issue layouts for display issues.
(Source: Atlassian Support Documentation, "Manage project roles")
Security levels (Option C):
Security levels (part of an issue security scheme) restrict which issues a user can view, not which fields are displayed within an issue. If users can see issues but not the field, security levels are not the cause.
Extract from Documentation:
Issue security levels control issue visibility, not field visibility within an issue.
(Source: Atlassian Support Documentation, "Configure issue security schemes")
Validator (Option F):
Validators ensure conditions are met before a workflow transition (e.g., a field is filled). They do not affect whether a field is visible in the issue view or during operations.
Extract from Documentation:
Validators enforce conditions during transitions, not field visibility.
(Source: Atlassian Support Documentation, "Configure advanced work item workflows")
Step property (Option G):
Step properties (workflow properties) control behaviors like editability in a status (e.g.,jira.issue.editable). They do not directly control field visibility on screens or in the issue view.
Extract from Documentation:
Workflow properties manage status behaviors, not field visibility. Use screens or issue layouts for display issues.
(Source: Atlassian Support Documentation, "Use workflow properties")
Additional Notes:
To resolve the issue, check:
Project settings > Screens: Ensure the custom field is on the relevant screen(s) for the project’s issue types.
Project settings > Issue layout: Verify the field is not in theHidden fieldssection.
These configurations requireproject admin(for issue layout) orJira administrator(for screens) privileges.
Other potential causes (not listed) includefield configurations(if the field is hidden for all issue types in the project), but screens and issue layouts are the most direct reasons.
You need to grant members of the Compliance team access to all of your company-managed projects in Jira. All the projects were created with a shared configuration and need to remain that way. You must decide if a project role is required to accommodate any of their requirements. Identify the requirement that necessitates the use of a project role.
Only some Compliance users can delete issues and they differ in each project.
All members need to be able to move issues.
Only two Compliance users should be able to see secured issues.
Only some Compliance users need to create shared dashboards.
Since all company-managed projects share a single configuration (including permission schemes), permissions are applied uniformly across projects. Aproject roleis necessary when a requirement involves project-specific differences in user permissions, as roles allow membership to vary by project. The requirement thatonly some Compliance users can delete issues and they differ in each project(Option A) necessitates a project role, as it requires project-specific user assignments for theDelete Issuespermission.
Explanation of the Correct Answer (Option A):
The requirement states thatonly some Compliance users can delete issues, and the specific usersdiffer in each project. In a shared permission scheme, permissions likeDelete Issuesare granted to users, groups, or project roles. Using a group would apply the same users across all projects, which does not allow for different users perproject. Aproject role(e.g., “Compliance Deleters”) can be added to theDelete Issuespermission in the shared permission scheme, and different Compliance users can be added to this role in each project’sProject settings > People, accommodating the project-specific variation.
Exact Extract from Documentation:
Manage project roles
Project roles allow permissions to be granted to different users in each project, even with a shared permission scheme.
To configure:
Create a new project role inSettings > System > Project roles(e.g., “Compliance Deleters”).
Add the role to a permission (e.g.,Delete Issues) in the permission scheme (Settings > Issues > Permission schemes).
Add users to the role in each project’sProject settings > People.Example: GrantDelete Issuesto the “Compliance Deleters” role, then assign different users to the role in each project.Note: Project roles are ideal for permissions that vary by project while maintaining a shared scheme.(Source: Atlassian Support Documentation, "Manage project roles")
Why This Fits: A project role allows different Compliance users to have theDelete Issuespermission in each project, satisfying the requirement for project-specific variation while keeping the shared configuration, making Option A the correct answer.
Why Other Options Are Incorrect:
All members need to be able to move issues (Option B):
TheMove Issuespermission can be granted to all Compliance users via a group (e.g., “Compliance Team”) in the shared permission scheme. Since the requirement applies uniformly to all members across all projects, a project role is not necessary, as there is no project-specific variation.
Extract from Documentation:
Permissions likeMove Issuescan be granted to a group in a shared permission scheme, applying to all projects without needing project-specific roles.
(Source: Atlassian Support Documentation, "Manage permissions in Jira Cloud")
Only two Compliance users should be able to see secured issues (Option C):
Secured issues are managed by anissue security scheme, where security levels define who can view issues (e.g., specific users, groups, or roles). To allow only two Compliance users to see secured issues, you can create a security level listing those two users explicitly or a group containing only them. This does not require a project role, as the same two users apply across all projects, and security levels are part of the shared configuration.
Extract from Documentation:
Issue security levels can specify individual users or groups to restrict visibility. Project roles are not required unless visibility varies by project.
(Source: Atlassian Support Documentation, "Configure issue security schemes")
Only some Compliance users need to create shared dashboards (Option D):
Creating shared dashboards requires theShare dashboards and filtersglobal permission, not a project-level permission. This can be granted to a group containing the relevant Compliance users inSettings > System > Global permissions. Since this is a global permission, it does not vary by project and does not require a project role.
Extract from Documentation:
TheShare dashboards and filtersglobal permission allows users to share dashboards. It is grantedglobally, not via project roles.
(Source: Atlassian Support Documentation, "Manage global permissions")
Additional Notes:
Steps to configure Option A:
Create a “Compliance Deleters” project role inSettings > System > Project roles.
Add the role to theDelete Issuespermission in the shared permission scheme (Settings > Issues > Permission schemes).
For each project, add the appropriate Compliance users to the “Compliance Deleters” role inProject settings > People.
This configuration requiresJira administratorprivileges to create the role and modify the permission scheme, but project admins can manage role membership.
The shared configuration (permission scheme, etc.) is preserved, as the project role integrates seamlessly.
A custom notification event must be fired in the workflow transition of a company-managed project. Which element must be configured?
Validator
Transition property
Condition
Post function
Trigger
To fire a custom notification event during a workflow transition in a company-managed project, apost functionmust be configured in the workflow. Post functions are used to perform actions, such as firing events, after a transition is executed. TheFire a Generic Eventpost function (or a specific event post function) is used to trigger the custom notification event.
Explanation of the Correct Answer (Option D):
Apost functionis a workflow element that executes actions after a transition is completed. To fire a custom notification event, theFire a Generic Eventpost function (or a similar event-specific post function) is added to the transition, specifying the custom event. This event is then mapped to recipients in the project’s notification scheme to send notifications.
Exact Extract from Documentation:
Configure workflow post functions
Post functions are executed after a transition is completed and can perform actions like firing events for notifications. Out-of-box post functions include:
Fire a Generic Event: Fires a specified event (e.g., a custom event) to trigger notifications defined in the notification scheme.To configure:
Go toSettings > Issues > Workflows.
Edit the workflow and select the desired transition.
Add theFire a Generic Eventpost function and select the custom event.Note: The event must be defined inSettings > System > Eventsand mapped to recipients in the project’s notification scheme.(Source: Atlassian Support Documentation, "Configure advanced work item workflows")
Why This Fits: Thepost functionis the workflow element responsible for firing a custom notification event during a transition, making Option D the correct choice.
Why Other Options Are Incorrect:
Validator (Option A):
Validators check conditions before a transition is executed (e.g., ensuring a field is filled). They do not trigger events or send notifications.
Extract from Documentation:
Validators ensure that conditions are met before a transition can proceed. They do not perform actions like firing events.
(Source: Atlassian Support Documentation, "Configure advanced work item workflows")
Transition property (Option B):
Transition properties are used to customize transition behavior (e.g., restricting who can see a transition button). They do not trigger events or send notifications.
Extract from Documentation:
Transition properties customize transition behavior, such as visibility or restrictions, but do not fire events or trigger notifications.
(Source: Atlassian Support Documentation, "Configure advanced work item workflows")
Condition (Option C):
Conditions determine whether a user can see or execute a transition (e.g., restricting to a role). They do not trigger events or send notifications.
Extract from Documentation:
Conditions restrict who can perform a transition. They do not execute actions like firing events.
(Source: Atlassian Support Documentation, "Configure advanced work item workflows")
Trigger (Option E):
Triggers in workflows (not to be confused with automation rule triggers) are used to automatically execute transitions based on external events (e.g., a commit in a linked repository). They do not fire notification events.
Extract from Documentation:
Triggers automatically execute transitions based on external events (e.g., code commits). They do not fire notification events.
(Source: Atlassian Support Documentation, "Configure advanced work item workflows")
Additional Notes:
Before configuring the post function, the custom event must be created inSettings > System > Eventsby a Jira administrator.
The project’s notification scheme must map the custom event to the desired recipients (e.g., users, roles, or groups).
Configuring the post function requiresJira administratorprivileges, as workflows are managed at the system level.
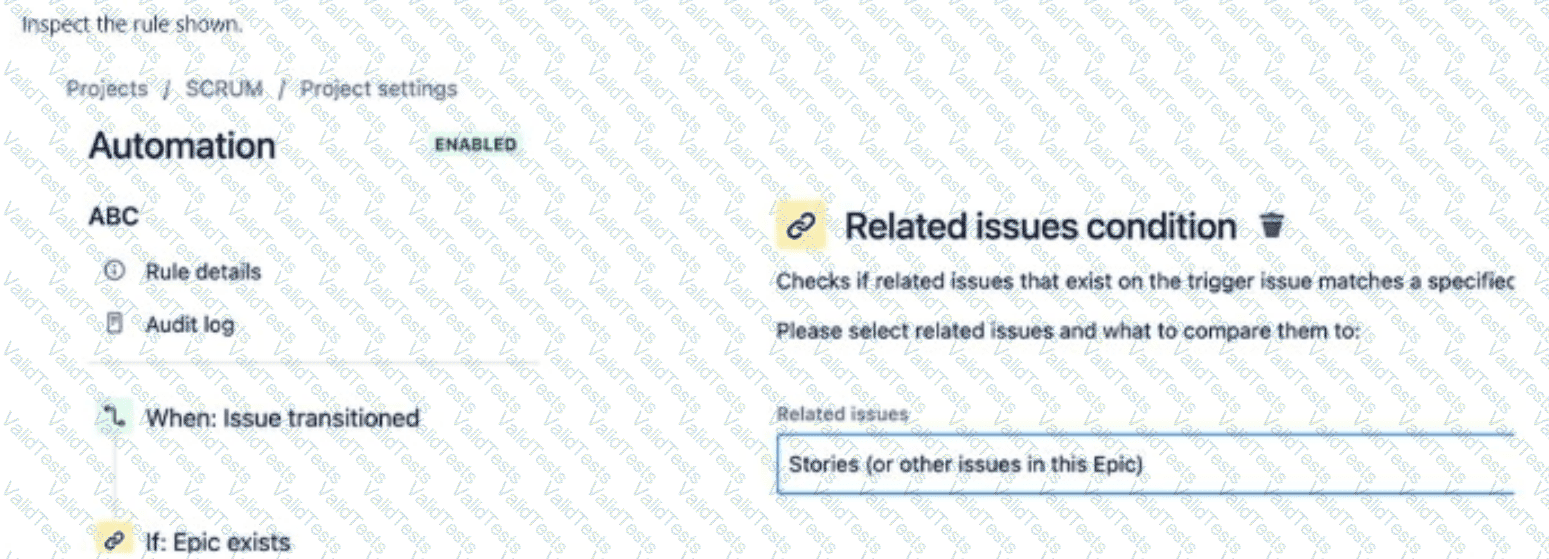
What is being transitioned in the last component of the rule?
A single story
Multiple stories
An epic
The trigger issue
One or more sub-tasks
The automation rule in the SCRUM project triggers when an issue is transitioned, checks if an Epic exists, and includes a Related issues condition that evaluates whether Stories (or other issues in this Epic) exist. The question asks what is being transitioned in the last component of the rule. Based on the rule structure, the last component is the Related issues condition, which does not perform a transition—it only checks a condition. However, interpreting the question in the context of the entire rule, the trigger issue (Option D) is the issue being transitioned in the initial When: Issue transitioned component, and subsequent components (like conditions) do not introduce new transitions unless explicitly stated (e.g., via an action).
Explanation of the Correct Answer (Option D):
The rule structure is:
When: Issue transitioned: This is the trigger, meaning the rule runs when an issue (the trigger issue) is transitioned to a new status in the workflow.
If: Epic exists: This condition checks if the trigger issue is associated with an Epic (e.g., it’s an Epic itself or a Story linked to an Epic).
Related issues condition: Stories (or other issues in this Epic): This condition checks if there are Stories (or other issues) related to the Epic associated with the trigger issue.
The last component shown is the Related issues condition, which does not perform a transition—it only evaluates whether Stories exist in the Epic. However, the question likely intends to ask about the issue being transitioned in the overall rule context. The When: Issue transitioned trigger indicates that the trigger issue is the one undergoing the transition that initiates the rule.
Since the rule does not yet include an action (e.g., transitioning related issues), the only issue being transitioned in the rule’s execution is the trigger issue—the issue that was transitioned to activate the rule.
Exact Extract from Documentation:
Jira automation components
Automation rules act on the trigger issue by default, which is the issue that activates the rule (e.g., the issue transitioned for an Issue Transitioned trigger).
Conditions like Related issues condition check for related issues (e.g., Stories in an Epic) but do not transition issues unless an action is specified.
Actions like Transition issue apply to the trigger issue or related issues if specified (e.g., via a branch).Note: Without a branch or action, the rule does not transition additional issues beyond the trigger.(Source: Atlassian Support Documentation, "Automate your Jira Cloud instance")
Why This Fits: The trigger issue is the issue being transitioned in the When: Issue transitioned component, and the Related issues condition does not introduce a new transition. Thus, the trigger issue (Option D) is the issue being transitioned in the rule’s context.
Why Other Options Are Incorrect:
A single story (Option A):
The Related issues condition checks for Stories in the Epic but does nottransition them—it only evaluates their existence. The rule does not yet include an action to transition a single Story, and the trigger issue (being transitioned) is not specified as a Story (it could be an Epic or another issue type).
Extract from Documentation:
The Related issues condition evaluates related issues but does not transition them unless an action (e.g., Transition issue) is specified.
(Source: Atlassian Support Documentation, "Jira automation conditions")
Multiple stories (Option B):
Similar to Option A, the rule does not transition multiple Stories. The Related issues condition only checks for Stories in the Epic, and no action is shown to transition them. The trigger issue is the one being transitioned.
Extract from Documentation:
Transitioning multiple issues requires a branch (e.g., For Stories) and a Transition issue action, which is not present in the rule.
(Source: Atlassian Support Documentation, "Jira automation actions")
An epic (Option C):
The If: Epic exists condition checks for an Epic, but the trigger issue (being transitioned) could be any issue type (e.g., an Epic, Story, or Task). The rule does not specify that the trigger issue is an Epic, so this is not definite.
Extract from Documentation:
The Issue Transitioned trigger applies to any issue type, not specifically Epics, unless filtered by a condition (e.g., Issue Type = Epic).
(Source: Atlassian Support Documentation, "Jira automation triggers")
One or more sub-tasks (Option E):
The rule does not mention Sub-tasks; the Related issues condition focuses on Stories in the Epic. There is no branch or action to transition Sub-tasks, and the trigger issue is the one being transitioned.
Extract from Documentation:
To transition Sub-tasks, use a branch like For Sub-tasks with a Transition issue action, which is not present in the rule.
(Source: Atlassian Support Documentation, "Jira automation actions")
Additional Notes:
The rule is incomplete as shown, lacking an action (e.g., transitioning Stories or the Epic). The question likely assumes the focus is on the trigger issue being transitioned in the When component.
If the rule were to include an action (e.g., Transition Stories to Done), the answer might involve Stories, but the current rule stops at the condition.
The rule is configured in Project settings > Automation and requires project admin privileges for project-level rules.
Users in a company-managed project need to capture various attributes about incoming bugs. They want to manage the options themselves and name the field ‘Type of Bug’. Which field type meets their need?
Custom field of type Select List (multiple choices)
Custom field of type Labels
Labels system field
Custom field of type Select List (single choice)
The users need a field namedType of Bugto capture attributes about bugs, with the ability to manage the options themselves. The field should be a custom field (to allow naming itType of Bug) and support a predefined list of options that users can manage. TheCustom field of type Select List (single choice)(Option D) meets these needs, as it provides a dropdown list with manageable options for a single selection.
Explanation of the Correct Answer (Option D):
ASelect List (single choice)custom field allows users to choose one option from a predefined list (e.g., “UI Bug,” “Backend Bug”). As a custom field, it can be namedType of Bug, and project admins or Jira admins can manage the options (add, edit, or remove) in the field’s configuration. This field type is ideal for categorizing bugs with a single attribute, and the manageable options meet the requirement for users to control the list.
Exact Extract from Documentation:
Create a custom field
TheSelect List (single choice)field type provides a dropdown menu where users can select one option from a predefined list.
To create:
Go toSettings > Issues > Custom fields.
Create a new field and selectSelect List (single choice).
Name the field (e.g., Type of Bug) and define options.
Add the field to the project’s screens.Note: Admins can manage the options (add, edit, remove) in the field’s configuration.(Source: Atlassian Support Documentation, "Manage custom fields in Jira Cloud")
Why This Fits: TheSelect List (single choice)custom field allows naming the fieldType of Bug, provides a single-selection dropdown, and lets users manage the options, perfectly meeting the requirements.
Why Other Options Are Incorrect:
Custom field of type Select List (multiple choices) (Option A):
ASelect List (multiple choices)custom field allows users to select multiple options from a predefined list. While it could be namedType of Bugand have manageable options, the requirement implies capturing a single attribute per bug (e.g., one type), making single-choice more appropriate than multiple-choice.
Extract from Documentation:
TheSelect List (multiple choices)field allows multiple selections. UseSelect List (single choice)for single-value categorization.
(Source: Atlassian Support Documentation, "Manage custom fields in Jira Cloud")
Custom field of type Labels (Option B):
ALabelscustom field allows users to enter free-text tags, which are not predefined and can lead to inconsistent values (e.g., “UI Bug,” “UIBug”). The requirement for users to manage options suggests a controlled list, not free-text entry, making this unsuitable.
Extract from Documentation:
TheLabelsfield type allows free-text tags. For a predefined list, useSelect List (single choice)orSelect List (multiple choices).
(Source: Atlassian Support Documentation, "Manage custom fields in Jira Cloud")
Labels system field (Option C):
TheLabelssystem field is a global field that allows free-text tags, similar to a custom Labels field. It cannot be renamed toType of Bug, and its options are not predefined or manageable in the same way as a select list. This does not meet the naming or option management requirements.
Extract from Documentation:
TheLabelssystem field cannot be renamed and allows free-text tags. Custom fields likeSelect Listare needed for specific names and controlled options.
(Source: Atlassian Support Documentation, "Manage fields in Jira Cloud")
Additional Notes:
Steps to configure:
Create aSelect List (single choice)custom field namedType of BuginSettings > Issues > Custom fields.
Define the options (e.g., “UI Bug,” “Backend Bug”).
Add the field to the project’s screens (Project settings > Screens).
Grant users permission to manage options (typically requiresJira adminorproject adminprivileges).
Configuring the custom field requiresJira administratorprivileges, but project admins can manage options if granted access.
The field should be added to the issue layout for visibility in the issue view.
You want to create a new link type that looks identical in linked issues. How can you achieve this?
Create the link type with no inward link description.
Disable bidirectional linking globally.
Choose the same name for the inward and outward link descriptions.
Create the link type with no outward link description.
To create a new link type in Jira Software Cloud that looks identical in linked issues (i.e., the link description is the same regardless of the direction of the link), you shouldchoose the same name for the inward and outward link descriptions(Option C). This ensures that the link type appears with the same description in both the source and target issues.
Explanation of the Correct Answer (Option C):
In Jira,issue link typesdefine relationships between issues, with anoutwarddescription(for the source issue) and aninward description(for the target issue). For example, a “Blocks” link type might have “blocks” as the outward description and “is blocked by” as the inward description. To make the link type look identical in both linked issues, you set the same description for both the inward and outward links (e.g., “relates to” for both). This results in the link appearing as “relates to” in both issues, regardless of which issue is the source or target.
Exact Extract from Documentation:
Manage issue link types
Issue link types define relationships between issues, with separateoutwardandinwarddescriptions.
To create a link type:
Go toSettings > Issues > Issue linking.
Add a new link type.
Enter aName(e.g., Relates), and set theOutward descriptionandInward description(e.g., both as “relates to”).Impact: If the inward and outward descriptions are the same, the link appears identical in both linked issues.Note: Requires Jira administrator permissions.(Source: Atlassian Support Documentation, "Configure issue linking in Jira Cloud")
Why This Fits: Setting the same name for the inward and outward link descriptions ensures the link type looks identical in linked issues, meeting the requirement and making Option C the correct answer.
Why Other Options Are Incorrect:
Create the link type with no inward link description (Option A):
Jira requires both aninwardandoutwarddescription when creating a link type. Leaving the inward description blank is not allowed, and even if possible, it would not make the link look identical in both issues—it would result in an empty or default description in the target issue.
Extract from Documentation:
Bothinwardandoutwarddescriptions are required when creating a link type. Blank descriptions are not supported.
(Source: Atlassian Support Documentation, "Configure issue linking in Jira Cloud")
Disable bidirectional linking globally (Option B):
There is no concept ofbidirectional linkingin Jira’s issue linking system, and no global setting exists to disable it. Issue links are inherently bidirectional (a link from issue A to B implies a reverse link from B to A), and the descriptions control how they appear. Disabling linking is not an option.
Extract from Documentation:
Issue links are bidirectional, with inward and outward descriptions defining the relationship. No global setting exists to disable bidirectionality.
(Source: Atlassian Support Documentation, "Configure issue linking in Jira Cloud")
Create the link type with no outward link description (Option D):
Similar to Option A, Jira requires anoutwarddescription when creating a link type. Leaving it blank is not allowed, and it would not achieve identical appearance in both issues, as the source issue would lack a description.
Extract from Documentation:
Bothoutwardandinwarddescriptions are mandatory for issue link types.
(Source: Atlassian Support Documentation, "Configure issue linking in Jira Cloud")
Additional Notes:
Steps to configure:
Go toSettings > Issues > Issue linking.
ClickAdd link type.
Enter aName(e.g., “Relates”) and set bothOutward descriptionandInward descriptionto the same value (e.g., “relates to”).
Save the link type.
Configuring issue link types requiresJira administratorprivileges.
The new link type will appear identically in both linked issues (e.g., “Issue A relates to Issue B” and “Issue B relates to Issue A”).
You need to identify issues that meet both conditions:
• Tom set the priority value to “Highest” sometime this month.
• The priority value may or may not be “Highest” now.
Which JQL query returns the expected results?
priority changed to Highest by tom before endOfMonth()
priority was Highest by tom after startOfMonth()
priority was Highest by tom during (startOfMonth(), endOfMonth()) and priority = Highest or priority != Highest
priority was Highest by tom and (priority = Highest by tom after startOfMonth() or priority != Highest)
To find issues where Tom set theprioritytoHighestduring the current month, regardless of the current priority value, the JQL query must use theWASoperator to check the historical priority value and theBYclause to specify the user (Tom), along with a time range for the current month. The correct query ispriority was Highest by tom after startOfMonth()(Option B).
Explanation of the Correct Answer (Option B):
The conditionTom set the priority value to “Highest” sometime this monthrequires checking the issue’s change history for thepriorityfield. TheWASoperator checks if a field had a specific value at some point, and theBYclause filters for changes made by a specific user (Tom). Theafter startOfMonth()clause ensures the change occurred within the current month (from the first day of the month to the present).
The conditionthe priority value may or may not be “Highest” nowmeans the query should not filter based on the current priority value, whichOption Bcorrectly avoids by not including a current-state condition (e.g.,priority = Highest).
The querypriority was Highest by tom after startOfMonth()returns issues where Tom changed the priority toHighestafter the start of the current month, satisfying both conditions.
Exact Extract from Documentation:
Advanced searching - operators reference
TheWASoperator checks if a field had a specific value at some point in the issue’s history.
priority was Highest by tom after startOfMonth() returns issues where thepriorityfield was set toHighestby the usertomafter the start of the current month.Note: TheWASoperator does not check the current field value, only historical values. Useafterto specify a time range.(Source: Atlassian Support Documentation, "Advanced searching - operators reference")
Why This Fits: The query usesWASto check historical priority changes by Tom toHighestwithin the current month, without restricting the current priority, making Option B the correct answer.
Why Other Options Are Incorrect:
priority changed to Highest by tom before endOfMonth() (Option A):
TheCHANGEDoperator checks for transitions in field values, butbefore endOfMonth()includes all changes up to the end of the current month, including past months, which is too broad. The query needs to limit changes to the current month (e.g.,after startOfMonth()).
Extract from Documentation:
TheCHANGEDoperator requiresFROMandTOclauses for specific transitions.before endOfMonth()includes all prior changes, not just the current month.
(Source: Atlassian Support Documentation, "Advanced searching - operators reference")
priority was Highest by tom during (startOfMonth(), endOfMonth()) and priority = Highest or priority != Highest (Option C):
Theduring (startOfMonth(), endOfMonth())clause is valid for time ranges, but the additional conditionpriority = Highest or priority != Highestis redundant and always true (it includes all issues). However,duringis less precise thanafter startOfMonth(), as it may exclude changes on the last day of the month depending on timezone handling. This makes the query less optimal.
Extract from Documentation:
Theduringclause defines a time range but may have edge cases with end dates.after startOfMonth()is simpler for current-month filtering.
(Source: Atlassian Support Documentation, "Advanced searching - operators reference")
priority was Highest by tom and (priority = Highest by tom after startOfMonth() or priority != Highest) (Option D):
The clausepriority = Highest by tom after startOfMonth()is invalid, as theBYclause cannot be used with current-state conditions likepriority = Highest. TheWASoperator already covers the historical change, and the additionalor priority != Highestis unnecessary and complicates the query.
Extract from Documentation:
TheBYclause is used withWASorCHANGED, not with current-state conditions likepriority = Highest.
(Source: Atlassian Support Documentation, "Advanced searching - operators reference")
Additional Notes:
The query assumesHighestis a valid priority value (check inSettings > Issues > Priorities).
The query can be tested inIssues > Search for issuesand saved as a filter.
Ensure Tom’s user account is correctly referenced (e.g., username or user ID) and that the user running the query hasBrowse Projectspermission.
Currently, all users in your instance can see all issues in the BRAVO company-managed project. You received these new requirements:
Some BRAVO issues should only be visible to managers.
Some BRAVO issues should only be visible to supervisors.
The remaining BRAVO issues should remain visible to all users.Identify two elements that must be configured. (Choose two.)
Issue security scheme
Set Issue Security permission
Global permissions
Browse Projects permission
Administer Projects permission
To meet the requirements of restricting visibility of some BRAVO issues to managers, others to supervisors, and keeping the remaining issues visible to all users, you need to configure anissue security schemeto define security levels and theSet Issue Securitypermission to allow users to apply these levels. These two elements are critical for implementing issue-level security in a company-managed project.
Explanation of the Correct Answers:
Issue security scheme (Option A):
Anissue security schemedefines security levels that restrict who can view issues based on criteria such as users, groups, or roles. To meet the requirements, you need to create at least three security levels: one for managers, one for supervisors, and one (or none, for default visibility) for all users. The scheme is then applied to the BRAVO project to enforce these visibility rules.
Exact Extract from Documentation:
Configure issue security schemes
Issue security schemes define security levels to restrict who can view issues. Each level specifies users, groups, or roles (e.g., managers, supervisors) who can see issues assigned to that level.
To create a scheme:
Go toSettings > Issues > Issue security schemes.
Create a new scheme and add security levels (e.g., “Managers Only,” “Supervisors Only,” “All Users”).
Assign the scheme to a project inProject settings > Issue security.Note: Security levels override theBrowse Projectspermission for restricted issues.(Source: Atlassian Support Documentation, "Configure issue security schemes")
Why This Fits: The issue security scheme is necessary to create security levels that restrict visibility to managers, supervisors, or all users, addressing all three requirements.
Set Issue Security permission (Option B):
TheSet Issue Securitypermission allows users to select a security level for an issue (via theSecurity Levelfield). Without this permission, users cannot assign issues to the “Managers Only” or “Supervisors Only” security levels,which is necessary to implement the restricted visibility requirements. This permission must be granted to appropriate users (e.g., project admins or specific roles) in the project’s permission scheme.
Exact Extract from Documentation:
Set Issue Security permission
TheSet Issue Securitypermission allows users to set or change the security level of an issue, determining who can view it. This permission is granted via the project’s permission scheme.
To configure:
Go toProject settings > Permissions.
Add users, groups, or roles (e.g., Administrators) to theSet Issue Securitypermission.Note: Without this permission, users cannot assign issues to specific security levels, even if a scheme is configured.(Source: Atlassian Support Documentation, "Manage permissions in Jira Cloud")
Why This Fits: TheSet Issue Securitypermission is required to enable users to apply the security levels defined in the issue security scheme, ensuring that issues can be restricted to managers or supervisors as needed.
Why Other Options Are Incorrect:
Global permissions (Option C):
Global permissions (e.g.,Administer Jira,Create Projects) control system-wide actions, not project-specific visibility. Issue visibility is managed by project-level permissions and security schemes, not global permissions.
Extract from Documentation:
Global permissions control system-wide actions, such as administering Jira or sharing filters. Issue visibility is managed by project permissions and issue security schemes.
(Source: Atlassian Support Documentation, "Manage global permissions")
Browse Projects permission (Option D):
TheBrowse Projectspermission allows users to view issues in a project. While all users currently have this permission (since they can see all BRAVO issues), modifying it does not address the need to restrict specific issues to managers or supervisors. Issue security schemes overrideBrowse Projectsfor restricted issues.
Extract from Documentation:
TheBrowse Projectspermission allows users to view issues in a project, but issue security levels can further restrict visibility for specific issues.
(Source: Atlassian Support Documentation, "Manage permissions in Jira Cloud")
Administer Projects permission (Option E):
TheAdminister Projectspermission allows users to manage project settings, such as components or permission schemes. While it may be needed to configure the issue security scheme or permissions, it is not directly required to meet the visibility requirements.
Extract from Documentation:
TheAdminister Projectspermission allows managing project settings but is not required to set issue security levels or view restricted issues.
(Source: Atlassian Support Documentation, "Manage permissions in Jira Cloud")
Additional Notes:
To implement the requirements, create an issue security scheme with three levels:
“Managers Only” (e.g., restricted to a “Managers” group).
“Supervisors Only” (e.g., restricted to a “Supervisors” group).
“All Users” (or no security level, allowingBrowse Projectsto apply).
Assign the scheme to the BRAVO project and grant theSet Issue Securitypermission to users who need to assign these levels (e.g., project admins).
The configuration requires Jira administrator privileges to create the scheme, but project admins can manage security levels within the project.


